Category Archives: Recipes

Spicy Bean Soup for a Cold Winter’s Night

In Maine, notorious for its long stretches of cool and sometimes downright cold weather, we can eat soup eight months out of the year. (If June is rainy and cool, the way it traditionally has been, then make that nine months.)

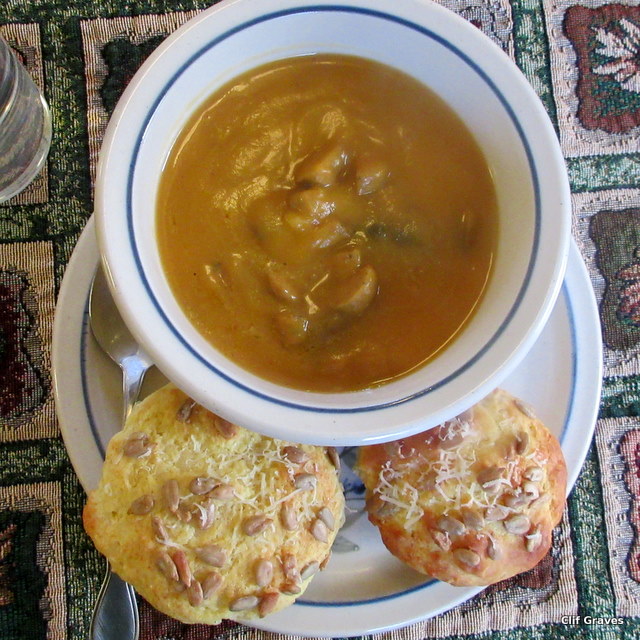
Fortunately, Clif and I love soup, and we make a big pot at least once a week, which lasts the two of us for several nights. We have many different recipes, which we make in rotation, and this means we have a variety of flavors to enjoy. We are never bored with soup.

Warm, nourishing, filling, frugal, there is so much to like about soup, not the least of which is that it can accommodate many different diet requirements and tastes—vegan, vegetarian, meat-lover, low-carb, low-cal, lower sodium. As an incredible bonus, soup is one of the few dishes that actually tastes better the next day. And the day after that.  Finally, soup is a forgiving medium, well suited for improvisation and seat-of-the-pants cooking. (Yes, that is my style.)

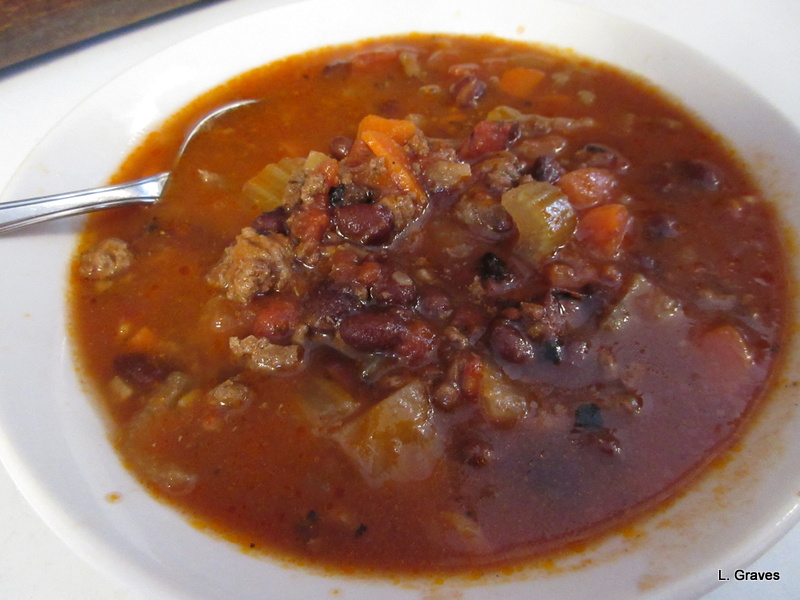
Last night, I made a spicy bean soup, good enough to serve to family and friends. I look forward to the days when we can gather around the table again, and talk about books, politics, movies, television, nature, gardening, and other interesting things. A crusty bread would go perfectly with this soup and so would a green salad with a homemade vinaigrette. For dessert, baked apples with a bit of vanilla ice cream.

Blogging friends, I wish you could join us. Friends who live nearby…after the pandemic! Clif and I are planning to host soup nights on a regular basis.

Here is the basic recipe, which includes kidney beans, peppers, and mushrooms. After that, you could add ground beef, ground chicken, veggie crumbles, Beyond Beef, meat sausage, or veggie sausage. After the broth, beans, and veggies simmered, we added a cup textured vegetable protein (TVP) and a cup of Israeli couscous, both of which gave the soup a satisfying bulk.

Spicy Bean Soup

Ingredients

  • 2 Tablespoons of oil
  • 1 medium onion, diced
  • 3 cloves of garlic, minced
  • 4 cups of broth
  • 2 cups of water
  • 1 (28 oz) can of diced tomatoes, including liquid
  • 6 cups of cooked kidney beans—4 (15 oz) cans
  • 1 cup mushrooms, chopped
  • 1 cup sweet peppers, diced
  • 2 tablespoons of tomato paste
  • 1 tablespoon of chili powder
  • 1 teaspoon of cumin
  • 1/2 teaspoon of oregano
  • 1/2 teaspoon of coriander
  • 1/2 teaspoon of salt
  • 1/4 teaspoon red pepper flakes
  • Soy sauce, to taste—I just splash a bit in
  • Add ins: cooked ground beef or chicken, TVP, pasta, rice, couscous, whatever you have on hand or strikes your fancy

Instructions

  1.  Heat the 2 tablespoons of oil in large stockpot. Sauté onions for 5 to 7 minutes. Add garlic and sauté for a minute or so. Add broth, water, tomatoes, kidney beans, mushrooms, peppers, tomato paste, and spices, including soy sauce. (If using ground meat, add now.) Simmer for 40 minutes. Taste and add more spices, if so desired.
  2. Ten minutes before serving, add TVP, crumbles, couscous, or pasta. Simmer until done.


The Velocity of Spring and the Easiest Soup Ever

In northern New England, spring always drags her pretty heels until suddenly she bursts upon us in all her glory. This year, however, the burst seems to have come at lightening speed.

Here is the picture I took on Monday, April 3, to toast my blog-friends Derrick and Jackie.

Here is a picture I took on Wednesday, April 19, a little over two weeks later.

Even by Maine standards this is fast, fast, fast, and I just can’t get over the velocity with which spring has come this year.

The male goldfinches have begun to turn bright yellow, the phoebes are singing their  “fee-bee, fee-bee” song, and my perennials are poking their bright green leaves up from the cold dirt.

Tra-la, tra-la! Spring is here, and even though yesterday and today have been chilly and rainy, I know that winter is firmly behind us.

Time to remove the leaves from the front garden beds (me). Time to rake the yard and clean up the sand by the edge of the road (Clif).

Because of the chilly weather—very common in Maine in the spring—for supper last night I had soup in mind, specifically a curried chickpea and cauliflower soup.

I poked around  the Internet,  and using suggestions from various recipes, I came up with the easiest, tastiest soup I have ever made. And I mean ever. This is chiefly due to using cans of diced tomatoes with green chilies. Spiced with onion and garlic as well as green chilies, these canned tomatoes are so flavorful that they make an excellent albeit spicy base for a soup, and no additional onion or garlic are required.

Add chickpeas, cauliflower, and a few other spices. Let the soup bubble and violà! You will have a spicy, satisfying soup for a cool spring day. Broiled toast with olive oil and grated cheese makes a fine accompaniment.

In fact, who could ask for anything more?

Curried Chickpea and Cauliflower Soup

Makes 6 generous servings

Ingredients

  • 2 (14.5) ounce cans of diced tomatoes with mild green chilies
  • 2 cans of water, using the chili cans
  • 2 (15,5) ounce cans of chickpeas, drained
  • 2 cups of cauliflower, cut small. (Add more or less, depending on how thick with ingredients you like your soup.)
  • 1 teaspoon of curry powder
  • 1 teaspoon of fresh ginger, minced
  • 1/2 teaspoon of cumin
  • 1/4 teaspoon of coriander
  • Salt and pepper to taste. (I added neither.)
  • Splash of milk, optional

Directions

  1.  Put all the ingredients into a slow-cooker.
  2. Cook on high for three or four hours. On low for about eight hours.
  3. When the cauliflower is tender, the soup is done.
  4. Near the end, add the splash of milk—coconut would be lovely—but this is optional.
  5. See what I mean about this being the easiest soup ever?

Ten a Day: A Winter Bean and Vegetable Soup

Lately, Clif and I have been talking about improving our diet. We are, ahem, at that age when the body needs all the help it can get. It’s not that we don’t eat well—we eat a fair amount of fruit and vegetables—but our diet is definitely heavy on the carb side. So, we decided to ramp up the vegetables and replace white bread and wraps with whole wheat.

On the weekend, we’ll allow our selves some treats. After all, this is a marathon, not a sprint.

How appropriate, then, to come across this in the Guardian: “Forget five a day, eat 10 portions of fruit and veg to cut risk of early death.” Basically, the gist of the piece is that we need to dismiss the advice to eat five servings of fruit and vegetables per day. Instead, we should be eating ten. Lest this sound too daunting, three tablespoons of peas count as one serving, as well as two spears of broccoli, and one half grapefruit. There is a chart in the piece outlining what ten a day would look like. (Oh, if only there were a similar requirement for chocolate!)

This advice is based on “[t]he analysis in the International Journal of Epidemiology [that] pooled the results from 95 different studies involving a total of approximately 2 million people.”

The studies indicate that eating “up to 800g of fruit and vegetables – equivalent to 10 portions and double the recommended amount in the UK – was associated with a 24% reduced risk of heart disease, a 33% reduced risk of stroke, a 28% reduced risk of cardiovascular disease, a 13% reduced risk of total cancer, and a 31% reduction in premature deaths.”

As always, further studies are needed to confirm the results, but how can you go wrong eating more fruit and veggies?

And, to round out the coincidences, a day or two before I read the article, I made a vegetable and bean soup that includes carrots, celery, cabbage, tomatoes, and black beans. I’m not sure if a big bowl would tick off five servings of veggies—beans count, too—but it must come pretty darned close.

This soup has other benefits as well. It is not expensive to make, even if you use organic ingredients, and everything can be tossed into a slow-cooker, where the soup will simmer away, filling the whole house with a delightful smell. Best of all, as my Yankee husband put it, the soup is pretty darned good.

A word of warning about the following recipe: As is my habit, I did not make this soup following a particular recipe. I just added ingredients as I saw fit. Soup is very forgiving this way. Therefore, much of what I’m suggesting will be guidelines. Feel free to experiment with the ingredients and the spices.

In the end, you will have wonderful, nutritious soup, and you will be well on your way to fulfilling your ten-a-day requirement of fruit and veggies.

img_6202

Bean and Vegetable Soup
Serves 8

Ingredients

  • Five or six cups of chopped vegetables. (I used cabbage, carrots, and celery.)
  • 2 (16 oz) cans of black beans, drained and rinsed
  • 1 onion, chopped
  • 3 cloves of garlic, minced
  • 1 (28 oz) can of fire roasted crushed tomatoes. (I used Muir Glen.)
  • 1 (1/2)  cans of water—using the can from the fire roasted tomatoes. Add more water if you want a thinner soup.
  • 1 pound of ground turkey
  • 1 tablespoon of chili powder
  • 1 teaspoon of cumin
  • 1/2 teaspoon oregano
  • 1/4 teaspoon of coriander
  • 1/4 teaspoon red pepper flakes
  • Salt to taste

Directions

  1. Cook and brown the ground turkey in a large skillet.
  2. Put the cooked turkey in a slow-cooker.
  3. Add the rest of the ingredients.
  4. Cook on low for nine or ten hours; high for five or six hours.
  5. Enjoy and feel virtuous.


Cocoa Muffins in New Silicone Muffin Cups

The day before yesterday, our friend Diane surprised us with a gift of twelve silicone muffin cups. Thanks so much, Diane!

IMG_4311

Naturally I had to immediately try them out, and at Clif’s insistence, I made cocoa muffins, which are really a dessert but with less fat and sugar than a cupcake. To guild the lily, I added three-quarters of a cup of chocolate chip, placed half a pecan on each muffin, and sprinkled the tops with a bit of sugar.

IMG_4350-1

The results? “Pretty darned good,” Clif said.

And best of all, there was hardly any sticking. I let the muffins cool and peeled away the silicone cups. Voilà!  Perfect little muffins with no bottoms left behind.

IMG_4354

Cocoa Muffins with Chocolate Chips

Ingredients

  • 1 egg
  • 1/4 cup of vegetable oil
  • 1 cup of milk
  • 1/2 cup of sugar
  • 2 cups of flour
  • 3 teaspoons of baking powder
  • 1 teaspoon of salt
  • 3 tablespoons of cocoa
  • 3/4 cup of chocolate chips
  • 12 pecan halves (optional)
  • Sugar for sprinkling on top of the muffins

Directions

  1. Preheat oven to 400°.
  2. Combine dry ingredients in medium-size bowl and set aside.
  3. In a large bowl, lightly beat the egg.
  4. Beat the vegetable oil and milk into the egg.
  5. Stir in the sugar.
  6. Sift dry ingredients into the wet mixture.
  7. Stir just until the ingredients are mixed. Do not overstir or muffins will be tough.
  8. Fold in the chocolate chips.
  9. Put the batter in either a greased muffin tin or ungreased silicone cups. (Makes twelve medium-size muffins.)
  10. Place pecan half on top.
  11. Sprinkle the tops with sugar.
  12. Bake for 20 to 25 minutes.
  13. If using a traditional muffin tin, let cool for five minutes before removing muffins. If using the silicone cups, let the muffins cool completely before removing from the cups.
  14. Butter, of course, goes with any kind of muffin, but berry jam tastes pretty darned good with these muffins, too.


Oh, Artichoke Dip!

Being a foodie, I love cuisines from many cultures, but one of my favorites is Mediterranean food.  To my way of thinking, basil, olive oil, and garlic form a holy trinity, and in my little herb garden, I am happy to report that my  basil that is growing very well. I also love sage, oregano, rosemary, lemons, feta, olives, and artichoke hearts. I get positively dreamy over the thought of going to Italy or southern France or Greece and eating the glorious food.

Therefore, when my friend Jill told me she was bringing artichoke dip for our Fourth of July gathering, I could have jumped for joy, if my creaky knees had allowed me to do so. I have never met an artichoke dip I haven’t adored. With spinach, with cream cheese, with crab—it’s all good.

However, Jill’s artichoke dip, made from a recipe given to her by her mother, is one of the best of I’ve ever had—smooth, creamy,  a little garlicky, with bits of chopped artichoke hearts. I could have some right now, and I will be making this dip to bring to an upcoming appetizer night we’ve been invited to.

Jill has graciously allowed me to post the recipe.  It can be served with carrots or other raw vegetables, crackers, or toasted pita bread brushed with olive oil. And on a warm summer’s night, as you are drinking wine and eating this dip, you can pretend you are in the Mediterranean, where the sky and the sea are bright blue and the food is oh so good.

Jill’s luscious artichoke dip next to Alice's beautiful salad.
Jill’s luscious artichoke dip next to Alice’s beautiful salad.


Hot Artichoke Dip

Servings: 16 servings, 2 Tbsp. each

1 can (14 oz.) artichoke hearts, drained and chopped
2/3 cup mayonnaise
1/3 cup sour cream
1 cup grated Parmesan cheese
1 clove garlic, minced
1 dash hot sauce

Heat oven to 350°F.
Mix ingredients until blended.
Spread onto bottom of 1 quart oven-safe serving dish.
Bake 20 to 25 minutes or until lightly browned.
Serve with rye bread, pita chips, or fresh vegetables.

Banana Bread and the Unfairness of Life

Spring is a fitful affair in Maine. After a nice spell of sunny weather, the past week has been gray and chilly with intermittent rain. Between rain showers, I did manage to clear the leaves from my flower beds. Now, weather permitting, it’s on to rearranging, fertilizing, and adding compost.  And planting flowers, which I love best of all.

Today—another gray day—our friends Judy and Paul are coming over for banana bread, tea, and talk. I’ll put out my flowered placemats, but not too soon as I know the cats will decide clean mats are the perfect place to nap. (I hate, hate, hate having the cats on our dining room table, but they sneak onto it every chance they get.) Not many flowers are up in the garden, but I’m hoping to make a small bouquet of pansies and hyacinths.

It’s a funny thing about banana bread. I usually only make it when the bananas are so far gone that I don’t even want them sliced in my cereal never mind eaten as is. In that sense, banana bread almost seems like a consolation prize, something you never make just because you want the bread but rather because you don’t want the bananas thrown out.

But after the bread is baked, there it is—lovely, sweet, brown, and, of course, banana-ie. Smear a thick slice with butter or cream cheese, and you have a bread worthy of tea. With peanut butter, it makes a perfect breakfast. Give a loaf to your library director for his birthday, and his wife will ask you for the recipe. (Kristen, I’m getting to that part.)

It hardly seems fair, then, to relegate banana bread to something you only make when the bananas have gone mushy. A bread that tasty deserves respect. But life is like that, and good things don’t always get the respect they deserve.

The banana bread I make is a basic recipe that I’ve adapted from good old Betty Crocker. However, I add an ingredient—cinnamon—that is not usually found in banana bread, and I believe it is this addition that makes my bread a teensy-weensy bit better than average.

My husband Clif believes that unless banana bread is very fresh, it is best toasted, and I must admit he has a point. Toasting adds a nice crunch as well as providing a warm surface for the butter to melt.

Toasted or untoasted, banana bread is a treat for a gray day. Or a sunny day. As I’m typing this, the clouds are thinning, and I see patches of blue sky. Let’s face it—any day is a good day for banana bread

IMG_1971

Banana Bread
Adapted from a Betty Crocker Recipe

Ingredients

  • 2(1/2) cups of flour
  • 3(1/2) teaspoons of baking powder
  • 1 teaspoon of salt
  • 1 teaspoon of cinnamon
  • 1 egg
  • 3/4 cup of milk
  • 3 tablespoons of vegetable oil
  • 1 cup of mashed bananas
  • 1 cup of sugar

Directions

  1. Heat oven to 350°.  Grease and flour a loaf pan.
  2. In a medium mixing bowl, combine four, baking powder, salt, and cinnamon and stir well.
  3. In a large mixing bowl, add the egg and whisk well. Add the milk, vegetable oil, mashed bananas, and sugar. Stir until it is well mixed.
  4. Add the dry ingredients to the egg mixture and stir—about a minute—until the batter is well mixed.
  5. Pour batter into greased and floured loaf pan.
  6. Bake 55 or 65 minutes or until a wooden pick comes out clean when inserted in the center.
  7. Let the bread set in the pan for at least 5 minutes before removing it.
  8. Serve with butter or cream cheese and be sure to appreciate this unassuming bread that can be tucked in the freezer when the loaf has cooled and be there whenever you need it.

Spring’s Leave of Absence: A Good Time for Squash Soup

In Maine, spring seems to have taken a leave of absence. The relatively warm days of late March have given way to some pretty brisk weather, and indeed my blog friends in New Hampshire and Massachusetts have gotten three to six inches of snow. Oddly enough, in central Maine, we only got a frizzing of snow.

Nevertheless, yesterday I found that the dog’s outside water dish had frozen solid. A chill wind blew through the backyard, and above the bird feeder, the birds on the branches swayed back and forth. A good thing, then, that the yellow of the male goldfinches is becoming ever brighter, a welcome flash in a landscape that is still lacking color.

IMG_1493

In the face of such cold weather, what to do, what to do? Why, make squash soup. In a basket in a back room, I had several of Farmer Kev’s squashes that had made it through the winter. Two were butternuts, in perfect condition. My, what good keepers that squash is.

Better still, as far as squash goes, a butternut is relatively easy to cut and peel, and it only has a small pocket of seeds to clean. In no time, one of Farmer Kev’s butternuts was cut in chunks and simmering with potatoes, carrots, onion, garlic, spices, and chicken broth. The whole house was fragrant with the smell of bubbling soup.

After the vegetables had simmered for an hour or so and were really, really soft, Clif took out the trusty immersion blender—surely one of a home cook’s best friends—and puréed everything so that the soup was lovely and thick and smooth.

Now, with the addition of, say, homemade croutons or oyster crackers or toasted squash seeds, that smooth soup would have been good as is. But Clif is the kind of guy who likes soup to have ingredients,  so into the puréed mixture I added browned chicken sausage, cooked white beans, and sautéed mushrooms and let everything simmer for fifteen or twenty minutes..

I also made cheese muffins to go with the soup, but that is a recipe for another week.

Clif’s verdict? “Pretty darned good,” and he went back for seconds. He did, however, make an unexpected comment. “This soup is so flavorful that I don’t think it needs any extra ingredients.”

There you have it—a puréed soup that is good enough on its own. Never did I expect to hear this assessment coming from my husband, who has been known to add so many Saltines to his bowl that the whole mess looks like cracker soup.

So to add ingredients to the puréed soup or not to add?

As you like it.

IMG_1486

Butternut Squash Soup

Ingredients

  • 1 butternut squash, peeled, seeded, and cut into chunks
  • 2 carrots, peeled and cut into rounds
  • 2 potatoes, peeled and cut into chunks
  • 4 cloves of garlic, peeled and cut in half. (If present, remove green center sprout.)
  • 1 onion, peeled and chopped
  • 32 ounces of chicken broth or water
  • 1/4 teaspoon of white pepper
  • 1 teaspoon of dried tarragon
  • 1 teaspoon of celery seed
  • 1 teaspoon of cumin
  • Salt to taste
  • Optional: beans, mushrooms, sausage, chicken or whatever cooked addition seems good to add to the soup after it has been puréed.

Directions

  1.  In a large stockpot, heat a tablespoon or two of oil and add onions, sautéing until they are soft.
  2. Add the squash, carrots, and potatoes and sauté a few minutes with the onions.
  3. Add the garlic and sauté for a minute.
  4. Pour in the chicken broth or water and stir.
  5. Add the spices and let the mixture simmer for at least an hour, until the vegetables are very, very soft.
  6. Purée the mixture with a blender, and I strongly recommend an immersion blender. Do put the pot in the sink if you use an immersion blender. You will save yourself a lot of mess.
  7. Add other cooked ingredients, if so desired, and simmer for 20 minutes or so.
  8. Before eating this flavorful soup, give thanks for squash and for spring, whenever it may come.


Of Apple Muffins and Housing Prices

IMG_1433On Tuesday, our friends Judy and Paul came over for muffins, tea, and talk. We discussed many things but one topic was the movie The Big Short, which is about the 2008 financial crisis and the bursting of the U.S.  housing bubble. This utterly engaging and creative movie is now available on DVD, and I think it should be required viewing for everyone over sixteen. Make that fifteen.

Only a few people saw the financial crisis coming, and some of these people are profiled in the movie. However, a few years before the fall, some of us could see that housing prices had become so high that average folks simply could not afford them. And despite the drop in prices that came about after the Great Recession, houses are still too expensive for many people.

A couple of years ago, I remember walking with my daughter in her South Portland neighborhood, and we passed a cute little Cape that was for sale.

“I checked on the price,” Shannon said, “and it’s going for $250, 000.”

“Son of a biscuit!” I said, or something to that effect. The house was sweet and well cared for. It was also what I would call a “bread and butter” house, an average little home perfect for a family just starting out. Nice but modest and nothing special. Certainly not special enough to warrant such a high price.

“How can average people afford such prices?” I asked.

“They can’t,” Shannon replied. “That’s why so many people rent. Or, they buy homes farther away and commute to their jobs.”

But even in Gorham, a town outside Portland, a modest but well-kept home with three bedrooms starts at $200,000. (In central Maine, where I live, it’s about $150,000.) Now, I realize that for other parts of the country, these prices might sound like chump change, but consider who Maine’s largest employer is: Hannaford Supermarket. Certainly, some people at the top make a good salary, but most of the people working for Hannaford don’t make a living wage. Most of them aren’t even technically working full time and therefore don’t receive benefits.

And rents aren’t exactly cheap, either. This means that in Maine, as well as in much of the rest of the country, housing prices or rent prices are a real burden for a significant part of the population. I’m not clever enough to come up with a solution, but do we really want a society where average wages cannot buy an average house? Or rent a decent apartment? (Throw in the cost of education and transportation, and no wonder you have a restive populace.)

This is a weighty topic. A good thing, then, on Tuesday, that we had apple muffins on Tuesday to sweeten the conversation. These muffins have a nut-crumb topping that would be good on almost any muffin, say, blueberry or pumpkin or banana.

Apple Muffins with a Nut-Crumb Topping
Adapted from a Betty Crocker recipe

Ingredients

For the muffins:

  • 2 cups of flour
  • 3 teaspoons of baking powder
  • 1 teaspoon of salt
  • 1/2 teaspoon of cinnamon
  • 1/2 cup of sugar
  • 1/4 cup of vegetable oil or melted butter, cooled slightly
  • 1 cup of milk
  • 1 egg
  • 1 apple, peeled and grated

For the topping:

  • 1/3 cup of brown sugar, packed
  • 1/3 cup of chopped pecans or walnuts
  • 1/2 teaspoon of cinnamon

Directions

  1. Preheat oven to 400 degrees and grease the muffin tin. This recipe will make either 12 regular sized muffins or 6 large muffins.
  2. In a small bowl, mix the topping—the brown sugar, pecans, and cinnamon.
  3. In another small bowl, combine the flour, baking powder, cinnamon, and salt.
  4. In a large bowl, beat the egg. Add the milk and the oil or butter. Mix well. Add the grated apple and sugar. Mix again.
  5. Add the flour mixture, stirring only until the batter is mixed.
  6. Divide the dough among the muffin cups. Sprinkle each muffin with some of the crumb-nut topping.
  7. Bake for 20 or 25 minutes or until the tops are brown.
  8. Let the muffins rest in the tin on a rack for five minutes before popping them out.
  9. Enjoy with a bit of butter, which, for this Franco-American, improves many, many things.

Old-Timey Biscuits for a Gray Spring Day

Today the sky is Puritan gray, as gray as a bleak day in November. At the little house in the big woods, there is still snow in the front yard. Not much, but it is there.

IMG_1370

I am itching for warmer weather, to pick up sticks in the yard, to start removing leaves from my flower beds, to plant some pansies, one of my favorite flowers. How I love their little faces. There are, of course, many chores I could be doing inside, cleaning and organizing, but I don’t want to do any of them. The spring bug has bitten me, even though it doesn’t seem very much like spring in central Maine.

I know. This is Maine. This is March. I have the doldrums. I get them every year at about this time, and I am not alone. As I have mentioned in previous posts, March is not very popular in Maine, and many people get the doldrums during this  month. I wouldn’t categorize the doldrums as a full-blown depression but rather, a restlessness, an impatience that can make a person a little cranky.

But April, sweet April—not the cruelest month at all, not by a long shot—is just around the corner. In Maine, April is the month when the trees begun to bud and the flowers show their lovely green foliage. April is the month where the water runs along the side of the road, singing its spring song, and in the little swamp up from us, the peepers add their enchanting trill.

I’ve written this before, and I’m writing it again: Spring and rebirth are an old story that never gets old. Each year, I greet it with a beginner’s mind, so very grateful to be here for yet another spring.

In the meantime, we have March, seven more days of it. What to do? What to do? Why, make biscuits and turkey soup. Years back, I shared this biscuit recipe, but that was many posts ago, and I thought it was time to share it again. It is an old-timey recipe given to me by my mother, and it calls for heaping teaspoons of baking powder and a cup of milk, strong. Goodness, my mother could make biscuits. I’ve never tasted any that were better. Mine aren’t bad,  but they can’t compete with hers.

For a New Englander, any time is biscuit time, but they are especially good on what we call “raw” days, when the weather is gray and bone-chilling and all you can do is think about the darling buds of May. In fact, you’d settle for the swelling buds of April.

Serve homemade soup along with the biscuits, and you have what might be called a March consolation.

IMG_1367-1

Old-Timey Biscuits (Rochelle’s Recipe)

Ingredients

  • 2 cups of flour
  • 1 teaspoon of salt
  • 3 heaping teaspoons of baking powder
  • 4 tablespoons of shortening
  • 1 cup of milk, strong (Pour the milk until it comes just a bit above the one-cup mark.)

Directions

  1. In a large mixing bowl, add the flour, salt, and baking powder. Stir well.
  2. With a fork or a pastry blender, cut in the four tablespoons of shortening until the mixture is crumbly.
  3. Add the milk. The mixture will be very runny. (When it comes to biscuits, the softer the dough, the better.) Let it rest a few minutes until the baking powder kicks in to firm-up the dough.
  4. Scrape the dough onto a floured board or counter. With floured hands, pat it a few times until you have the desired thickness.
  5. Using a biscuit cutter or a glass, cut out the biscuits and put them in an ungreased 8×8 pan. Note: I like my biscuits squished together so that they come out very soft. If you like crispier biscuits, put them on a cookie sheet and leave space around them.
  6. Dab tops with butter.
  7. Bake them in a preheated 450 degree oven for 15 to 20 minutes or until the tops are golden brown.
  8. Serve ’em hot with plenty of butter. That is how they are best.

Of Chili Eggs and Home Fries

Yesterday, after posting a piece about our Sunday brunch, I had a request for the chili-egg recipe and another request for how to make home fries. Well, ask, and you shall receive.

The chili eggs are very rich with cheese and butter, and I only make them for our special brunches. Guests are usually wild about them, and it was Beth, I think, who described them as an omelet in a casserole dish. This recipe is easy to make up ahead of time, and as the chile eggs take forty-five minutes to bake, you can do other things while they  are cooking. Best of all, if there are leftovers, they reheat beautifully.

IMG_0724

Chili Eggs
Adapted from Jill Lectka’s recipe

Ingredients

  • 10 eggs
  • 1/2 cup of flour
  • 1 teaspoon of baking powder
  • 1/2 teaspoon of salt
  • 1 pound (16 ounces) of small curd cottage cheese
  • 8 ounces of Monterey Jack cheese, grated
  • 8 ounces of cheddar cheese, grated
  • 1 stick of butter, very soft
  • 1 (8 ounce) can of chopped chilis

Directions

  1. Preheat over to 350°.
  2. Butter a 9 x 13 inch pan.
  3. Beat eggs until light.
  4. Add cheeses, butter, and chilis and mix well. (The butter will be a little lumpy, and with my hands I often squish it through the mixture to make sure the butter is evenly distributed. This is a messy but effective technique.)
  5. Combine the flour, baking powder, and salt and add to the mixture.
  6. Pour the mixture into the buttered 9 x 13.
  7. Bake for 45 minutes or until the eggs are set and the top is golden brown.


Now onto the home fries. I don’t really have a recipe for them, only some tips.

  1. It is essential to cook the potatoes ahead of time so that they are well chilled when you fry them. Warm potatoes will crumble as they are being fried. For a brunch, this means cooking the potatoes the day before.
  2. I usually use red potatoes. If the skins are tender, I leave the skins on. If not, I peel the potatoes.  I cut them into large bite-sized pieces, put them in a large stock pan, cover them with water, bring to a boil, and let the potatoes simmer until they are tender.
  3. When the potatoes are done, I drain them, let them cool for a bit, and then put them in a glass bowl. I cover the bowl, and put it in the refrigerator. I let the potatoes chill thoroughly before using.
  4. Hint: Always cook twice as many potatoes as you think you’ll need. Somehow, you can never have too many home fries. I used five pounds for a recent brunch with six people.
  5. When frying, I use two, maybe three, skillets so the potatoes aren’t crowed. For a recent brunch, I had two stove-top skillets and one big electric skillet plugged in right by the stove. Hence my title: Captain Home Fries.
  6. Into the skillets, I put a generous pat of butter along with a little vegetable oil so that the butter won’t burn. I let the butter melt until it lightly sizzles in the oil.
  7. Then, into the skillets go the potatoes. (Onion lovers might want to add chopped onions along with the potatoes, but Clif and I prefer ours plain.) Let the potatoes fry undisturbed for five minutes or so, and after that, from time to time, stir them around with a spatula.
  8. Fry until the potatoes are golden brown, about 15 or 20 minutes.
  9. Drain on a plate with paper towels, then put them into a bowl. I usually sprinkle them with a little salt at this point. Serve them immediately, while they are hot.

And there you go—chili eggs and home fries. If you wanted to keep your brunch simple. then muffins (or toast) would be the perfect accompaniment. And maybe some apple sauce or fresh fruit in season.

Bon appétit!